lab03 : Intro to Web Applications
| num | ready? | description | assigned | due |
|---|---|---|---|---|
| lab03 | true | Intro to Web Applications | Fri 07/01 09:30AM | Wed 07/06 05:00PM |
| Midterm Exam | ||||
This is an individual lab on the topic of Java web apps on Heroku.
Step 0: Understanding what we are trying to do
What are we trying to accomplish again in this lab?
- In this lab, we will create a basic “Hello, World” type web app in Java”
- A web app is a piece of Java code that takes HTTP request messages as input, and responds with HTTP response objects as output.
- Heroku is a platform where we can host a Java web app.
Why use Heroku?
- Web applications run on the “server” side of the web architecture, not the client side.
- So to test a web application, we need to set up a web server that can run Java code.
- Configuring a web server for Java is challenging. But, fortunately, we don’t have to.
- Heroku.com offers “platform as a service” cloud computing for Java web applications.
- We’ll use the “free plan” that they offer for folks just getting started with learning Heroku.
- This puts your application “on the web”, for real, so that anyone in the world can access it 24/7
To run a servlet locally on your own machine, you could also use a servlet container such as Tomcat, Jetty, or Resin. Configuring those to run servlets locally on your own machine is not too bad, but configuring those to run on a shared hosting environment such as CSIL can be quite painful, so we are just going to avoid that altogether.
Limitations of the free plan of Heroku
- If no-one has accessed your web app for a while, it “goes to sleep”, so to speak.
- The first time someone tries to access it after it has gone to sleep, there is a noticable delay in the response, perhaps several seconds or even up to a minute.
- If too many people try to access your service per hour, eventually, you’ll run out of “free resources”.
- That is very unlikely to happen unless you make a web app that somehow attracts the attention of a very large audience.
- I suggest you try to avoid doing that with the web apps you develop for this class.
- I suggest you avoid doing that in general, unless/until you have some plan for how to make money off your web app to pay for the server resources. (With a credit card, you can set up Heroku to have higher usage limits, and to keep your app running so that response time is fast. But you should NOT need that for this course.)
Web Apps vs. Static Web Pages
You may already have some experience with creating static web pages, and/or with creating web applications (e.g. using PHP, Python (Django or Flask) or Ruby on Rails.) If so, then the “Learn More” section will be basic review.
If you are new to writing software for the web, you are strongly encouaged to read the background information at the “learn more” link below. - Web Pages vs. Web Apps
What are we trying to accomplish again in this lab?
If you just did a deep dive into the article Web Pages vs. Web Apps, it may be helpful to again review what we are trying to accomplish in this lab:
- In this lab, we will create a basic “Hello, World” type web app in Java”
- To test that, we need to run that on a server somewhere.
- Configuring a web server for Java is challenging. But, fortunately, we don’t have to.
- Heroku.com offers “platform as a service” cloud computing for Java web applications.
- We’ll use the “free plan” that they offer for folks just getting started with learning Heroku.
- This puts your application “on the web”, for real, so that anyone in the world can access it 24/7
Disk Quota
IMPORTANT: if you are working on CSIL, and at some point things just “stop working”:
- You get odd error messages, especially “cannot write file”, or “disk quota exceeded”
- You cannot log in—it takes your user name and password on the machines in Phelps 3525 or CSIL, but then just logs you out immediately.
Then you probably have a disk quota problem.
- The best way to troubleshoot this, if you cannot log in, is to ask someone else that CAN log in to allow you to use a terminal window on their screen.
- Use
ssh yourusername@csil.cs.ucsb.eduto get into your account from their terminal session.
- Use
- For troubleshooting tips, visit: CSIL Disk Quota Troubleshooting
Step 1: Create a Heroku Account associated with your umail.ucsb.edu
If you do not already have a Heroku account associated with your umail.ucsb.edu account, navigate to https://www.heroku.com/ and click the “Sign up for Free” link.

You’ll be asked for:
- First Name
- Last Name
- Email—use your @umail.ucsb.edu account.
- If you are a student registered for CMPSC 56 at UCSB, we need this association with your identity as a UCSB student in this course to give you credit for the work.
- But, if you are just doing this lab “for the experience” and don’t care about credit, you can use any email you like.
- Company (you may leave this blank).
- Preferred Development Language: We suggest you select “Java” if you are currently enrolled in CMPSC 56
- (Don’t worry; this doesn’t prevent you from using the account with other languages later.)
Step 2: Find the Heroku “Getting Started With Java” tutorial
Next, find the Heroku “Getting Started With Java” tutorial. There are two ways to find this:
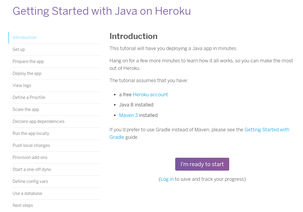
- (1) Just login to your Heroku account. If you are a new Heroku user, there may very well be some kind of obvious link, such as the one you find in the picture below to the right (“Java: Get Started”)
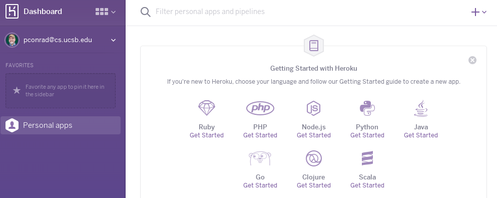
-
(2) Find the “docs” link from the menu at upper left. That should take you to documentation, where you can find the “getting started with Java” as well as many other helpful links. |
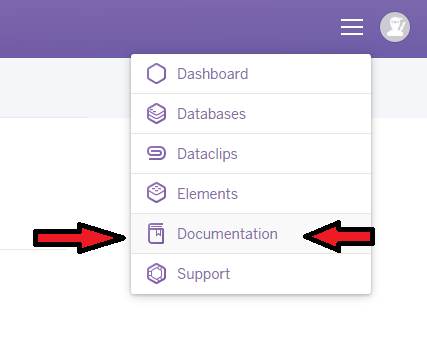 |
| |
| -
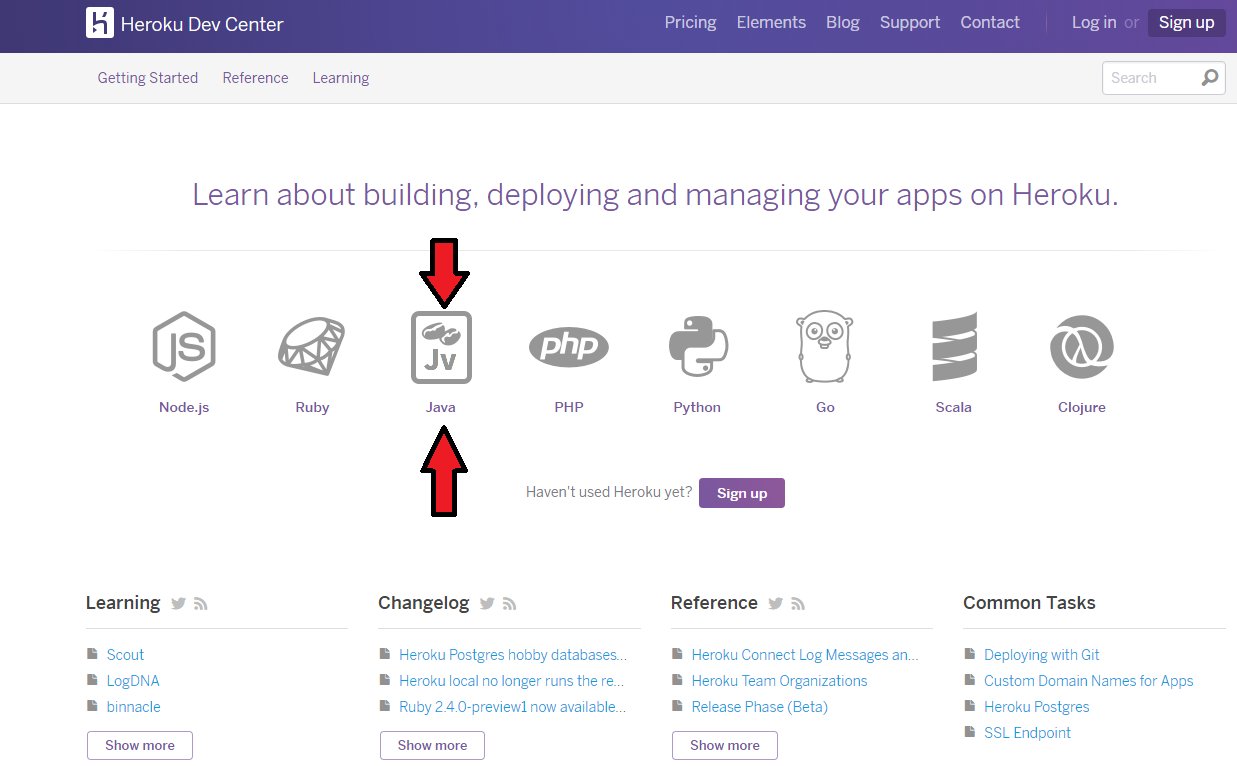
(3) Just do a web search for “heroku getting started java”.
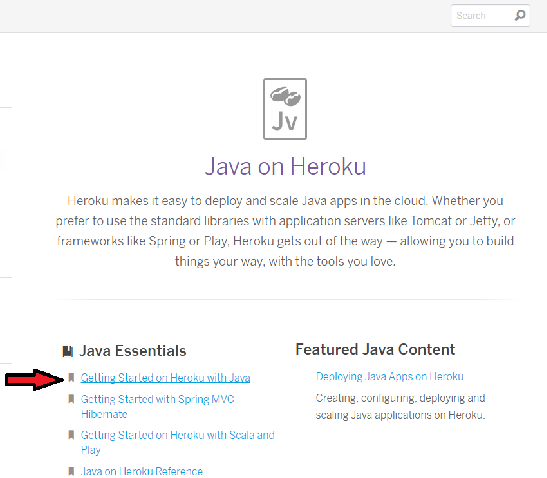
However, you get there, you are looking for the page that looks like the one at right below. The page at left below links directly to the one at right.
 |
 |
Step 3: Completing the Heroku Java Tutorial on CSIL
If want to work through this tutorial on your own laptop, you don’t need any special instructions to complete the tutorial.
- You will need to install Java 8 and Maven 3 first, as the instructions suggest
- But apart from that, it should “just work”.
But, if you are completing the tutorial on CSIL, you’ll need some extra guidance, because you don’t have the ability to install software yourself—at least not in the “standard” ways.
Therefore, some of the steps in the tutorial need to be modified a bit for the CSIL environment.
- Sometimes you need to either rely on software that has already been installed for you instead of installing it yourself
- Sometimes you do install software yourself, but in a “non-standard” way, i.e. into your own user account or scratch space instead of in the system folders (to which you do not have “write” access.)
- At every stage, there are “pitfalls” and “hints” specific to operating on CSIL. That’s why you may need this extra guide to completing the Heroku tutorial.
I suggest that you keep this page open in one web browser window, and the Heroku page open in another and follow through the two together.
Step 3a: Click to Start
The first page says that you need Java 8 and Maven 3 installed. Both are already installed on CSIL, so you are good to go there. Just click the “I’m Ready to Start” button.
Step 3b: Set Up
So, in the Set Up step, the instructions say “In this step you will install the Heroku Toolbelt.”
This instructions for this step, as written, absolutely will not work from a non-privileged account on CSIL.
If you are working on a CSIL machine—that is, a machine in Phelps 3525, the CSIL lab, or ssh’ing into CSIL—as opposed to working completely on your own computer, without using CSIL resources at all—you will need to make significant modifications to the instructions for this step.
Read and follow the instructions in this step carefully, and you should have no trouble.
Are you directly on CSIL, or using a Windows or Mac machine to access CSIL?
If you are using a Windows or Mac machine to access CSIL, then your web browser window is probably going to automatically “default” to a download option for the type of system your web browser is running on.
Just ignore the download, and skip over the next step.
Are you instead, choosing to do the tutorial entirely on your own machine, without using CSIL?
If you are using a Windows or Mac machine to access CSIL, then your web browser window is probably going to automatically “default” to a download option for the type of system your web browser is running on. In that case, you’ll download and install the Heroku Toolbelt at this step, then skip directly to the next step.
NOTE THAT WE ARE NOT PREPARED TO PROVIDE TECH SUPPORT FOR THIS OPTION. You are welcome to try it, and you’ll probably be fine and learn a lot, but you are on your own.
If you do choose that option, you must have installed the JDK for Java 8, and Maven 3 back at the “Set up” step.
Are you running directly on a machine in Phelps 3525 or the CSIL lab?
In this case, the instructions might give you the choice of various downloads: Windows, Mac, Debian/Ubuntu and Standalone.
Clearly the Windows and Mac options don’t apply. And we aren’t running Debian/Ubuntu as the version of Linux on the local UCSB machines, so that doesn’t apply.
So, you might think “standalone” is the answer. In fact, we are going to do a “variation” of the standalone option, but we aren’t going to follow the instructions literally. I’ll explain why, next, and explain what we ARE going to do instead.
So, for now, “choose” standalone, but DON’T follow the instructions listed.
What the “standalone” option would do.
Choosing Standalone invites you to type the following command, which you SHOULD NOT DO:
DO NOT DO THIS! –> $ wget -qO- https://toolbelt.heroku.com/install.sh | sh <– DO NOT DO THIS!
Why you shouldn’t do that
Here’s what that command does:
- Uses wget to download a shell script from the web
- Pipes that shell script into sh, which then just executes all of the commands in the script.
And, it turns out that the commands in that script require sudo permission, which means they can modify your system in any way shape or form.
To be fair, that’s not that unusual for software installers. And since it uses sudo, it will ask for permission first (i.e. for an administrator password, which you don’t have.) Still, though, this is a bit unusual from the standpoint of how things are typically done in the Unix/Linux world.
If you were to download this script, here’s what it does, in plain english:
- Downloads a tarball of code written in Ruby
- A tarball is a compressed archive of files
- You may be familiar with a “.zip file”. Similar idea.
- Executes the code with “sudo” permission.
Needless to say, that will fail. But it turns out, the only reason “sudo” permission is needed is that the script is trying to put the Heroku toolbelt software into the directory /usr/local/heroku/bin. That’s a directory that you as a regular user have no permission to write into.
What you should do instead
So, as the tip box above indicates, for various reasons, including the fact that you have no permission to write into /usr/local/heroku/bin, we can’t use the method suggested by the Heroku tutorial, and the automatic script won’t work.
But, it should be no problem to put the software into ${HOME}/heroku/bin by hand. So that’s what we’ll do. The following steps “mirror” what the automatic “Set Up the Heroku Toolbelt” procedure does, but in a way that will work on your CSIL account:
(1) Create a directory ${HOME}/heroku/bin
mkdir -p ${HOME}/heroku/bin
(2) cd into that directory
cd ${HOME}/heroku/bin
Use ls to verify that this is an empty directory. If not, empty it out before proceeding. (If you aren’t sure how, get some Unix help from a knowledgeable person.)
(3a) Download the tarball for the Heroku client. This URL comes from the install script that was in the “install.sh” that Heroku wanted us to download and execute directly. Instead, we’ll download it by hand, using wget:
wget https://s3.amazonaws.com/assets.heroku.com/heroku-client/heroku-client.tgz
(3b) Untar the tarball.
tar -xvf heroku-client.tgz
(4) You should now have a subdirectory called heroku-client.
And, you should now be able to run the heroku toolbelt client by typing the following. Give it a try:
${HOME}/heroku/bin/heroku-client/bin/heroku
(5) Optional: If you want to add this into your path, you should be able to do so by putting the following in your ${HOME}/.profile file (assuming you are using bash as your shell)
export PATH=${PATH}:${HOME}/heroku/bin/heroku-client/bin
That should allow you to just type “heroku” to run the heroku-client. Note that like any change to your .profile file, you either have to reload it to your shell, or open a new login shell to see the effect take place.
Try typing heroku at the shell prompt when logged into CSIL.
What do you see?
| This is what you want to see: | This is what you do NOT want to see: |
Many lines of output omitted… In this case, click on the button (shown below) on the Heroku tutorial web page, and continue: |
In this case, type N and hit enter, and then read through this step again. |

Step 3c: Prepare the app
Now, continue with the Prepare the app step. I would suggest doing this first though:
mkdir -p ~/cs56
cd ~/cs56
At this step, you are invited to do a git clone on a certain repo. This repo is the starting point code for working with Java on Heroku.
So do that git clone next—the one in the Heroku instructions.
Add two extra remotes
At this point we are going to do two extra steps. These aren’t strictly necessary from the standpoint of getting the code working on Heroku; rather, they are steps that will
- make it easier for you to work with the code going forward,
- and so that your TA and instructor can give you credit for the lab.
What we are going to do is to add two extra “remotes” to the git repo that you clone. Here is a brief explanation of what we are trying to do here:
- Recall that when you clone a git repo, you create a new repo on your local machine that is a “clone” of the git repo on the remote system.
- The git repo on the remote system is set up as a
remotein your.git/configfile calledorigin - In this case, that repo is a repo on Heroku’s server, and you don’t have any permission to push to it. If you even try to do “git push origin master”, you’ll end up with an error.
- Instead, we are going to set up two remotes: one called
githuband another calleducsb. These will be remotes on your https://github.com account, and your https://github.ucsb.edu account, respectively. - This will enable you to work with this code from either system.
- In practice, you’d only typically only need one of these or the other.
- We are adding both because we to help you learn the skill of moving code between remotes easily while preserving all of the git commit history
Here’s what to do to add a remote for https://github.com
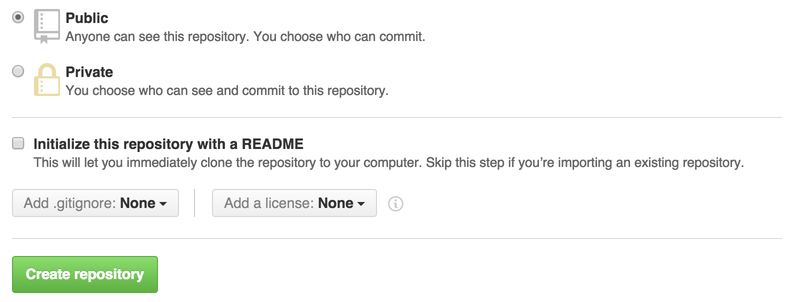
(1) Create a new public repository on your https://github.com account according to these instructions. READ ALL OF THEM before clicking the button to create the repo.
-
- Call it cs56-m16-lab03.
- Make it public
- This time, DO NOT create it with a README.md
- This time, DO NOT add a .gitignore or a license. You are creating an empty repo.
It should look like this:
Note that if you do accidentally create it with those files, you can still proceed, but you’ll have to deal with a “merge conflict” on those files. That’s not the end of the world—it’s actually much easier to resolve that folks may think. You just edit the conflicting files, and then do another “git add”, “git commit”, “git push”. But it’s an extra detail we don’t really want to deal with today if we can avoid it.
(2) Locate the “ssh” URL for that repo (e.g. something like git@github.com:yourgithubid/cs56-m16-lab03.git) You are going to copy/paste that, so have that ready.
(3) At the command line, cd into the place you cloned the java-getting-started repo provided in the Heroku tutorial. The type this command (substituting the
git remote add github paste-ssh-url-from-step-2-above-here
So, it will look something like this:
git remote add github git@github.com:yourgithubid/cs56-m16-lab03.git
Then, do this command: git push github master
If you then go to the https://github.com page for this repo, you should see the contents of the Heroku “java-getting-started” repo appear on the github.com page.
We are now going to repeat this step for https://github.ucsb.edu
(4) Create a new empty public repository on your https://github.ucsb.edu account called cs56-M16-lab03. Remember to select the options for NO README.md, NO .gitignore, and NO license so that you get an empty repo.
(5) Again, locate the “ssh” URL for that repo (same as in step 2 above))
(6) At the command line, cd into the place you cloned the java-getting-started repo provided in the Heroku tutorial (same as step 3 above). Then type this command:
git remote add ucsbpaste-ssh-url-from-step-5-above-here
So, it will look something like this:
git remote add ucsb git@github.com:yourgithubid/cs56-m16-lab03.git
Then, do this command: git push ucsb master
If you then go to the https://github.ucsb.edu page for this repo, you should see the contents of the Heroku “java-getting-started” repo appear on the github.com page.
Now, look in the .git/config file for your repo. (Recall that .git is a hidden directory in the top level directory of the repo.) You should see that you have three remotes listed, something like this.
Note that the names github and ucsb that we used for the additional remotes are arbitrary user-chosen identifiers.
- We could have called them
fooandbar, orsaltandpepper. - We chose the names
githubanducsbto make it easier to remember where they are stored.
The idea is that now:
- you can
git pullfrom any of these remotes where you have read access - you can
git pullfrom any of these remotes where you have write access
This is, in general, the mechanism you can use if you need to move code from one repo to another, e.g. from a repo on github.com to github.ucsb.edu, or vice-versa. You just git pull from one place, and git push to the other.
Note that in this setup the repos do NOT automatically stay in sync by any means. You always have to manually push to wherever you want the latest code to appear.
At a later stage, you’ll see that there is a command that automatically adds a fourth remote to your repo:
- This remote is called
heroku - When you
git push heroku masterthe code you push updates a running web app on the Heroku server
But, we’re getting ahead of ourselves. Let’s continue with the Heroku tutorial.
Step 3d: Deploy the app
For the Deploy the app step, the only note is that you cannot use the “heroku open” command if you are logged in via ssh without X11 forwarding. Instead, just open a web browser and point it at the URL you were given, in the message that came from the git push origin master step, e.g.
http://warm-eyrie-9006.herokuapp.com/ deployed to Heroku
NOTE THE DIFFERENCE BETWEEN the link in this line of output:
https://tranquil-meadow-35181.herokuapp.com/ deployed to Heroku
And the link in this output:
remote:
remote: Verifying deploy... done.
To https://git.heroku.com/tranquil-meadow-35181.git
The link to your web app is the blah-blah-12345.herokuapp.com link. The link that ends in .git is the git repo on Heroku that you are pushing to when you do “git push heroku master”.
They are different. Understand the difference.
- The link such as https://tranquil-meadow-35181.herokuapp.com/ or http://warm-eyrie-9006.herokuapp.com/ is the one you should put in a browser to see your running web app.
- Try going to that link in a browser.
How do I know what the link to my web app is?
In your .git/config file, there are a few lines that define the heroku remote:
[remote "heroku"]
    url = https://git.heroku.com/tranquil-meadow-35181.git
    fetch = +refs/heads/*:refs/remotes/heroku/*
You can quickly check what your URL is by typing this in the main directory of your repo:
grep git.heroku.com .git/config
Note that you then have to convert this git URL into a heroku url. In this case, for example:
- The git URL https://git.heroku.com/tranquil-meadow-35181.git
- Becomes: http://tranquil-meadow-35181.herokuapp.com
You can also find this any time you do a git push heroku master.
- If you try that and the app is up to date, you can force a push
- To force a push
- make an inconsequential edit to the README.md file (add a space, for example)
- then git commit
- then git push heroku master
This is also a way to “restart” the application.
Step 3d: What do I have now?
You now have a demonstration of some Java code that is running a web app.
Try this: add “hello” to the end of the URL for your web app:
If your web app is:
http://warm-eyrie-9006.herokuapp.com/
Try:
http://warm-eyrie-9006.herokuapp.com/hello
You should see a message such as this in the browser:
Hello World
Now, in your repo, edit the file src/java/Main.java and you should see this line of code:
get("/hello", (req, res) -> "Hello World");
Add a line below it that looks like this:
get("/ucsb", (req, res) -> "Go Gauchos");
Then do a:
git addgit commit -m "Go Gauchos"git push heroku master
Also, for good measure:
git push github mastergit push ucsb master
You will NOT likely be able to do
git push origin masterTHIS WON’T WORK.
Reason: origin, the place you cloned from, is a repo owned by Heroku. You have no “write permission” to that repo.
Now, try your webapp, but after the address, put /ucsb, e.g.
- Instead of: http://warm-eyrie-9006.herokuapp.com/hello
- Try: http://warm-eyrie-9006.herokuapp.com/ucsb
You should see “Go Gauchos”.
So, some Java code that shows up in a web app. We haven’t cured cancer, but its a start.
If you are interested to know more about what this code is, take a look at this: http://sparkjava.com/
This is, apparently, “Spark”, a tiny web framework for Java.
Step 3e: Continue with the rest of the tutorial
Now continue through these steps:
- View logs
- Define a Procfile
- Scale the app
- Declare app dependencies
- Run the app locally
- Push local changes
STOP when you get to provision add-ons, and read the next step.
Step 3f: Provision add-ons step: NO you don’t need a credit card
Previously, it was possible to accomplish the step labelled “Provision add-ons” without entering a credit card.
That appears to no longer be the case. So, just skip this step, and click on the button that says:
I’ve used an add-on
Then continue to the Start a one-off dyno step
Step 3g: Continue with remaining steps
Continue through these steps:
- Start a one-off dyno
- Define config vars
- Use a database
- Next steps
For the most part, the rest of the instructions work with no modifications, except for the following cautions:
- When running the app locally (via
heroku local web), you are running the web app directly on the CSIL machine where you are logged in. In this case, you can use this shell command to check whether the web app is running:
curl http://localhost:5000
You might also be able to type hostname to see the name of your machine, and the use URL such as http://butthead.cs.ucsb.edu:5000in a regular browser.
- When running the web app on heroku, the instructions typically tell you to type
heroku opento bring up a web browser directed towards the app on heroku. This might work if you are logged in directly on a machine in the CSIL or Phelps labs, but it will NOT work if you are ssh’d in (unless, perhaps, you are using XMing or some other X11 forwarding.) Instead, get the URL for your app from the Heroku Dashboard. Log on to http://heroku.com, and find your running web app there. It will give you the URL that you can use to bring it up in a regular browser.
Step 4: Submitting
This lab is mainly here to just get you famliar with working with web apps on Heroku. Before we can actually DO anything interesting, there is more to learn about how Java web apps are constructed, and how to work a database.
So, this lab is only worth (100 pts).
You need to complete it, and then go to the lab03 link on Gauchospace and do these things:
- Paste the link to your github.com lab03 repo
- Paste the link to your github.ucsb.edu lab03 repo.
- Paste a link to your running web app on Heroku (e.g. http://blonde-raccoon-90210.herokuapp.com)
There is more to come with Java web apps, but that’s it for this lab.